VoiceGPT - Build an AI Voice Assistant with Next.js, Node, WebSockets, OpenAI, Deepgram, and ElevenLabs


Table of contents
- Introduction
- High-Level Approach
- Set up the front end to record audio
- Set up the Node.js server to receive audio
- Send audio to the backend over WebSockets
- Transcribe audio with Deepgram
- Get chat completions from the OpenAI API
- Convert chat responses to audio with ElevenLabs
- Improve the UI
- Where to go from here
Introduction
In this article, you'll learn how to build an end-to-end AI voice assistant using the latest tools and APIs. Watch the demo below to see what you'll build.
See the GitHub repository for the completed code.
Tech Stack
Next.js
Node.js + Websockets
- We use WebSockets to decrease latency and make this a real-time experience.
OpenAI API - for chat completions
Deepgram - for real-time transcription
ElevenLabs - for speech synthesis
Skill Level
We assume some experience with Typescript, Node.js, and using APIs.
Why Build a Voice Assistant?
Voice AI is one of the untapped areas of AI today. With advancements in LLMs, there are tons of opportunities to build new apps and companies around voice. With this basic knowledge, you'll have the foundations to build cool new things like:
IVR systems powered by LLMs
Automated interviewing software
Voice notes apps
AI language translation
Much, much, more
High-Level Approach
Before jumping into the code, let's look at a high-level overview of what our system will do each time the user speaks:
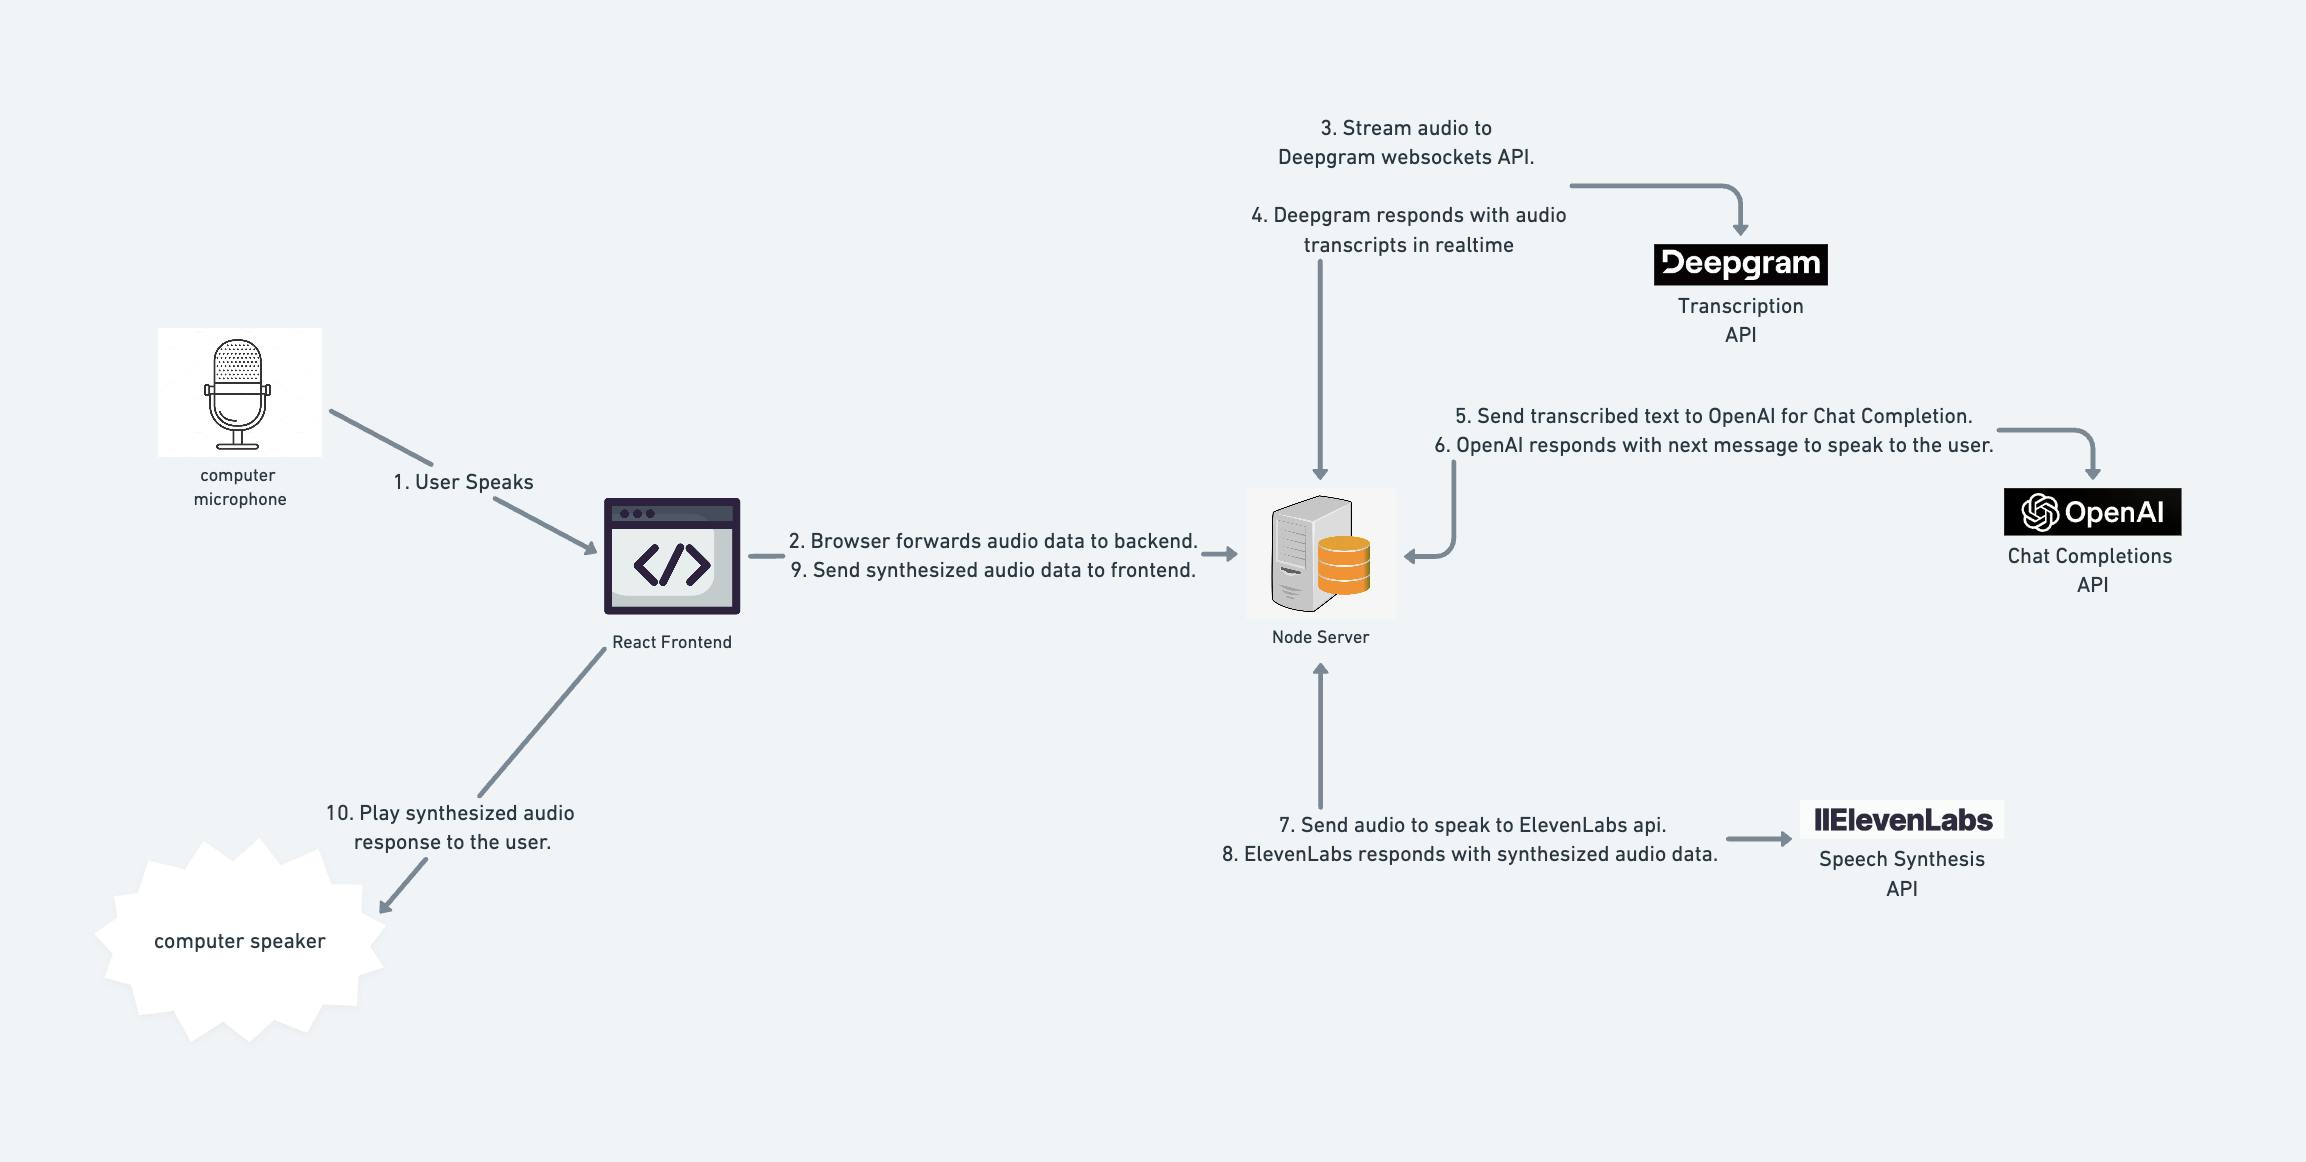
The browser picks up the spoken audio data.
It forwards this audio to the backend over the WebSocket connection.
The Node server streams this audio to Deepgram over their WebSockets API.
Deepgram transcribes the audio and asynchronously streams text back to our server.
We send the transcription to the OpenAI API, along with a prior history of the chat.
OpenAI responds with the next message to say to the user.
We send this message to the ElevenLabs API
ElevenLabs responds with audio data that contains the synthesized speech that we want to play to the user.
The server sends this audio back to the frontend, over the existing WebSocket connection.
The front end plays this audio back to the user.
Now we have enough context to start coding.
Set up the front end to record audio
Make a new folder for the Next.js frontend, and kick off a new Next project:
npx create-next-app@latest voice-gpt-frontend --use-npm
Then, follow the prompts to create your Next.js app. Feel free to keep all of the default settings.
Navigate to the directory you just created, and start the app:
cd voice-gpt-frontend
npm run dev
Navigate to http://localhost:3000 - you should see your Next.js app running. This is the default app. Let's get rid of all of the boilerplate on page.tsx, so we can start from scratch. Update page.tsx to contain the following code:
"use client";

import styles from "./page.module.css";

export default function Home() {
  return (
    <>
      <div className="title">VoiceGPT - your voice AI assistant</div>
    </>
  );
}
We'll worry about making it look nice later.
If you're seeing multiple rows of the gradient, remove the following snippet from globals.css:
body {
  color: rgb(var(--foreground-rgb));
  background: linear-gradient(
      to bottom,
      transparent,
      rgb(var(--background-end-rgb))
    )
    rgb(var(--background-start-rgb));
}
You should now have a simple Next.js app that looks like this:

Let's add some logic for accessing MediaRecorder, an in-browser API for accessing the user's microphone. Add the following logic to your component:
  const [mediaRecorder, setMediaRecorder] = useState<MediaRecorder | null>(
    null
  );

  useEffect(() => {
    navigator.mediaDevices.getUserMedia({ audio: true }).then((stream) => {
      setMediaRecorder(new MediaRecorder(stream));
    });
  }, []);

  useEffect(() => {
    if (mediaRecorder) {
      mediaRecorder.addEventListener("dataavailable", (event) => {
        console.log("received audio data from MediaRecorder");
      });
      mediaRecorder.start(500);
    }
  }, [mediaRecorder]);
This logic is straightforward - we access an audio stream and use it to create a new MediaRecorder instance.
When the media recorder is set, we add a "datavailable" event that fires when audio data becomes available. Then, we start the media recorder with the timeSlice parameter set to 500. This just means that audio is broken up into chunks of 500 ms.
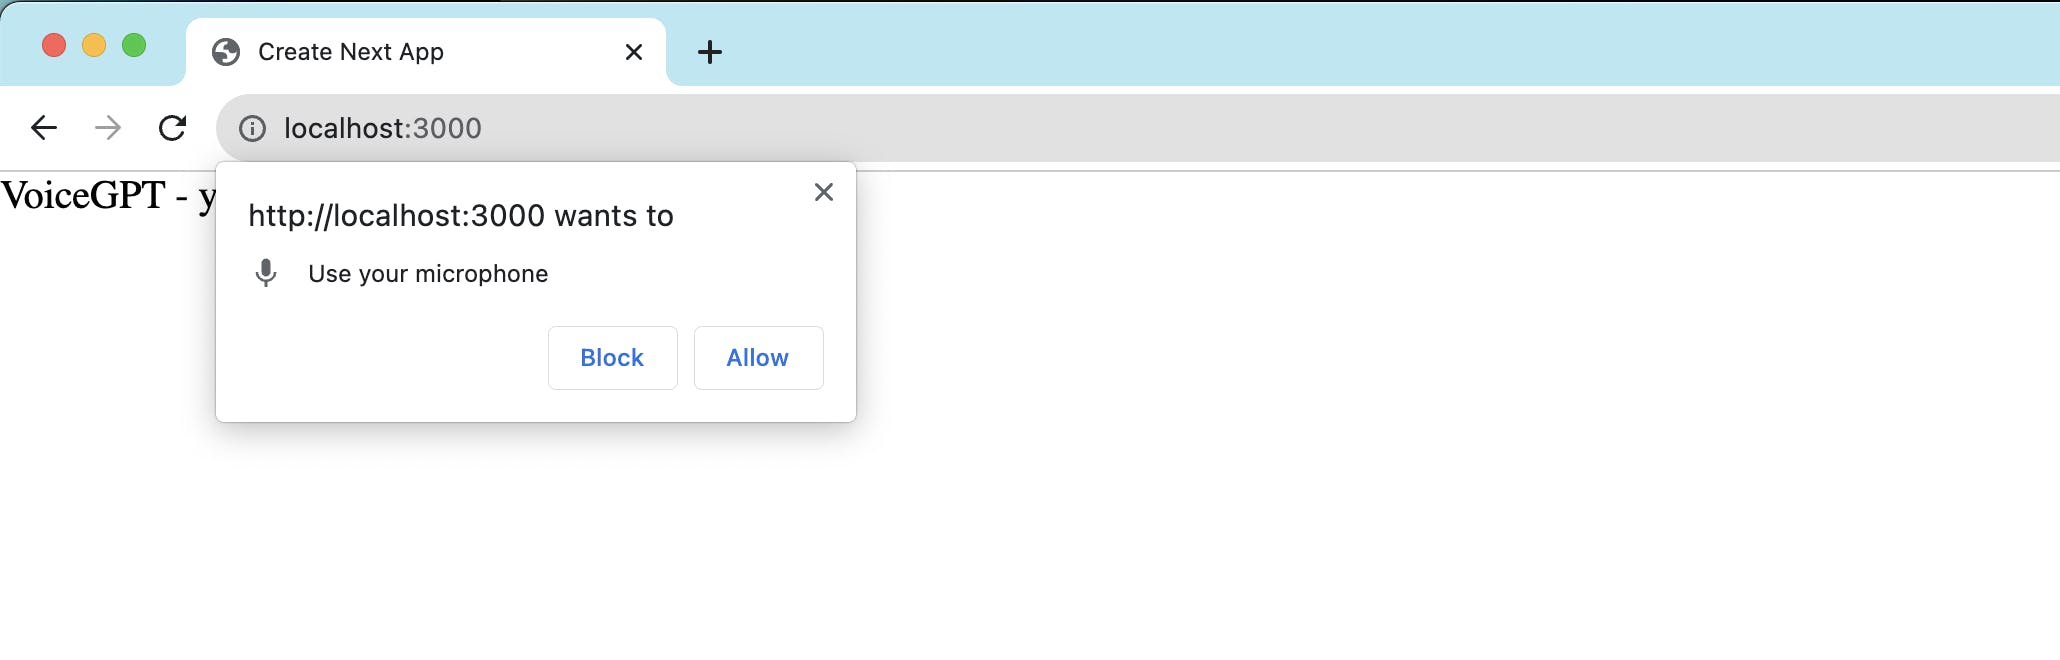
When you run your app next, your browser should ask for permission to use your microphone. Allow this. Then, open up your browser console and start speaking - you should see that it logs "received audio data from MediaRecorder" every half second.
Now we need to set up our server and start sending audio to it.
Set up the Node.js server to receive audio
Create a new directory, outside of our Next.js app, to store our Node server. Let's set up a TypeScript project in this new directory:
mkdir voice-gpt-backend
cd voice-gpt-backend
npm install typescript
npx tsc --init
touch index.ts
Now, let's add logic to index.ts to receive this audio. We'll start a socket.io WebSocket server and get it ready for connection. When it receives a new message, it will log a message.
Start by adding the needed dependencies:
npm install http socket.io @types/socket.io
npm install -d nodemon
Now add logic to start the socket.io server:
import http from "http";

import { Server, Socket } from "socket.io";

const server = http.createServer();

const socketIOServer = new Server(server, {
  // pre-emptively prevent any local CORs issues.
  cors: {
    origin: "http://localhost:3000",
  },
});

socketIOServer.on("connection", (socket) => {
  console.log("socket: client connected");

  socket.on("packet-sent", (data) => {
    console.log("socket: received audio packet from frontend.");
  });

  socket.on("disconnect", () => {
    console.log("socket: client disconnected");
  });
});

server.listen(4000, () => {
  console.log("server listening on port 4000");
});
Hopefully, the server logic is straightforward so far: we start a new server that is ready for new socket connections. When a connection is made, it listens for the "packet-sent" event and logs a message when it has received a message.
Now we need to start our server. Add the dev script to our package.json file:
  "scripts": {
    "dev": "nodemon index.ts"
  }
Now you can start the backend server by running npm run dev.
Send audio to the backend over WebSockets
Now we're ready to connect our web app to our backend and send audio over the WebSocket connection. Back in the frontend directory, install the socket.io-client library, which we'll need to make the connection.
npm install socket.io-client
Add the following lines to our second useEffect() function to start the socket. You'll also need the import statement import { io } from "socket.io-client"; at the top of the file.
const socket = io("ws://localhost:4000");
socket.on("connect", async () => {
    console.log("client connected to websocket");
});
This is simply starting a new socket client and pointing it at our backend server. Re-start the web app if needed, and open the logs. Check the logs for the backend as well - they should be connected to each other.
Now let's update our frontend logic to send audio data over the connection. To do this, move the MediaRecorder logic into the socket's "connect" callback. We'll also use socket.emit() to actually send the data over the audio data over the socket.
  useEffect(() => {
    if (mediaRecorder) {
      const socket = io("ws://localhost:4000");

      socket.on("connect", async () => {
        console.log("client connected to websocket");
        mediaRecorder.addEventListener("dataavailable", (event) => {
          if (event.data.size > 0) {
            socket.emit("packet-sent", event.data);
          }
        });
        mediaRecorder.start(500);
      });
    }
  }, [mediaRecorder]);
Refresh your web app. In the backend logs, you should now see that audio is being received with the log "socket: received audio packet from frontend."
Nice! We're now streaming audio to our backend from our client. Now it's time to transcribe our audio using Deepgram.
Transcribe audio with Deepgram
Deepgram is an API that enables us to quickly convert our audio into text. Luckily, they provide a Node.js SDK that makes this easy - we'll leverage this for our use case.
Before proceeding, you'll need to create an account with Deepgram and acquire an API key.
Next, install the SDK in our backend:
npm install @deepgram/sdk
Add a new file called deepgram.ts. This file will hold the logic for connecting to Deepgram:
import { Deepgram } from "@deepgram/sdk";
import { LiveTranscription } from "@deepgram/sdk/dist/transcription/liveTranscription";

let keepAlive: NodeJS.Timeout;

const DEEPGRAM_API_KEY = "YOUR_DEEPGRAM_API_KEY";

type TranscriptReceivedEventHandler = (data: string) => Promise<void>;

export function getDeepgramLiveConnection(
  transcriptReceivedEventHandler: TranscriptReceivedEventHandler
): LiveTranscription {
  //   instantiate Deepgram object
  const deepgram = new Deepgram(DEEPGRAM_API_KEY);
  const deepgramLive = deepgram.transcription.live({
    language: "en",
    punctuate: true,
    smart_format: true,
    model: "nova",
  });

  //   clear keepAlive if it's been set, and restart it
  function clearKeepAlive() {
    if (keepAlive) clearInterval(keepAlive);
  }
  clearKeepAlive();
  keepAlive = setInterval(() => {
    deepgramLive.keepAlive();
  }, 10 * 1000);

  //   add event listeners for open, close, and error
  deepgramLive.addListener("open", async () => {
    console.log("deepgram: connected");

    deepgramLive.addListener("close", async (data) => {
      console.log("deepgram: disconnected: ");
      clearInterval(keepAlive);
      deepgramLive.finish();
    });

    deepgramLive.addListener("error", async (error) => {
      console.log("deepgram: error recieved");
      console.error(error);
    });
  });

  //   add event listener for transcriptReceived - passed in by caller
  deepgramLive.addListener(
    "transcriptReceived",
    transcriptReceivedEventHandler
  );
  return deepgramLive;
}
We're doing a few different things in this file:
instantiating a Deepgram object with the API key.
adding logic to keep the connection alive (
deepgramLive.keepAlive()). Why? Deepgram will shut off the connection if we don't send a KeepAlive message every 12 seconds (see the docs). Sending this message just ensures that they don't shut off the connection on their end.setting up some basic event handlers for the "open", "close", and "error". These are just logging the respective event.
setting up a function that lets the caller set a callback function for the "transcriptReceived" event. We want the caller (
index.ts) to be able to configure what happens when we receive a transcript, as we'll see in the next step.
Now we can call our new function getDeepgramLiveConnection() to make this logic available in index.ts. Let's update our index.ts file so that it calls this function and prints the transcript that we get back from Deepgram:
// top of file
import { getDeepgramLiveConnection } from "./deepgram";

// ... existing server code

const deepgramLive = getDeepgramLiveConnection(async (data: string) => {
  const transcriptData = JSON.parse(data);
  // ignore metadata messages
  if (transcriptData.type !== "Results") {
    return;
  }
  const transcript = transcriptData.channel.alternatives[0].transcript ?? "";
  if (transcript) {
    console.log(`transcript received: "${transcript}"`);
  }
});
You're ready to test this out. Re-start your server and your client, and navigate to http://localhost:3000 in your browser. Try speaking - the words you say should get logged in your browser!

We're making great progress. Now it's time to utilize OpenAI chat completions to figure out how we should respond to the user.
Get chat completions from the OpenAI API
Before we start, you'll need to create an API key with OpenAI. Navigate to OpenAI to do this.
Next, install the OpenAI package.
npm install openai
Create a new file in your backend directory called openai.ts . This will hold the logic for connecting to OpenAI:
import { OpenAI } from "openai";
import { CreateChatCompletionRequestMessage } from "openai/resources/chat";

const openai = new OpenAI({
  apiKey: "YOUR_OPENAI_API_KEY",
});

// define initial message - the system telling OpenAI how to act
const messages: Array<CreateChatCompletionRequestMessage> = [
  {
    role: "system",
    content:
      "You are a voice assistant that the user is speaking to. Answer their question concisely. Your response will be spoken to the user, so it should be appropriate for the audio format. It shouldn't be longer than 2 sentences.",
  },
];

// define a simple interface for getting the next message in the chat.
export async function getOpenAIChatCompletion(
  newMessage: string
): Promise<string> {
  // get chat completion by sending all previous messages, including the latest one
  messages.push({
    role: "user",
    content: newMessage,
  });
  const chatCompletion = await openai.chat.completions.create({
    model: "gpt-3.5-turbo",
    messages,
  });
  return chatCompletion.choices[0].message.content || "";
}
In this file, we're implementing a simple interface that lets us retrieve a chat completion. We define our base prompt - this is a simple instruction to our LLM to tell it how to behave. See the chat completions documentation for more info on using the API.
Now let's update index.ts to call this new function. We want to call this function when we receive a transcription result from Deepgram. Let's make this code change and log the response from OpenAI after we receive it:
// top of file
import { getOpenAIChatCompletion } from "./openai";

// ... existing server code

const deepgramLive = getDeepgramLiveConnection(async (data: string) => {
  // ... existing Deepgram logic
  if (transcript) {
    console.log(`transcript received: "${transcript}"`);
    // send the transcription result we just received to OpenAI to get a response.
    const openAIResponse = await getOpenAIChatCompletion(transcript);
    console.log(`openAIResponse: ${openAIResponse}`);
  }
});
Now re-run your app and try asking a question. You'll see the OpenAI response printed in your server logs!

As you can see, the chat has the context of what we previously spoke about (I asked "How did he die?" and OpenAI knew that "he" was referring to George Washington). This is because our function getOpenAIChatCompletion() is keeping track of messages that were previously sent. Each time we ask OpenAI for a new chat completion, we send over the entire chat history.
We're now ready to speak back to the user. We'll use ElevenLabs to convert our chat responses to audio.
Convert chat responses to audio with ElevenLabs
Before we proceed, you'll need to get an API Key and voice ID from ElevenLabs. Create a free account to generate an API key.
Getting a voice ID requires one extra step - you'll need to call the API to get a list of available voices. Use the command below to do this.
curl -X 'GET' \
  'https://api.elevenlabs.io/v1/voices' \
  --header 'accept: application/json' \
  --header 'xi-api-key: YOUR_ELEVEN_LABS_API_KEY'
You should get a list of possible voice IDs to choose from. Feel free to use any of these - it doesn't matter too much for now. Just grab the ID of one of the voices in the JSON response. Later on, you can play with different voices to see which one you like best for your app.
Next, create a new file elevenLabs.ts that will hold our connection logic with the ElevenLabs API. Add the following code snippet:
import fetch from "node-fetch";

const ELEVEN_LABS_VOICE_ID = "YOUR_VOICE_ID";
const ELEVEN_LABS_API_KEY = "YOUR_ELEVEN_LABS_API_KEY";

export async function getElevenLabsAudio(text: string): Promise<ArrayBuffer> {
  const elevenLabsTextToSpeechURL = `https://api.elevenlabs.io/v1/text-to-speech/${ELEVEN_LABS_VOICE_ID}/stream?optimize_streaming_latency=1`;
  const headers = {
    accept: "audio/mpeg",
    "xi-api-key": ELEVEN_LABS_API_KEY,
    "Content-Type": "application/json",
  };
  const response = await fetch(elevenLabsTextToSpeechURL, {
    method: "POST",
    headers: headers,
    body: JSON.stringify({
      text,
    }),
  });
  return response.arrayBuffer();
}
We're using this file to implement a simple interface where we can pass in a string and receive an array buffer that contains synthesized speech.
Let's update our code in index.ts to call this new function.
// top of file
import { getElevenLabsAudio } from "./elevenLabs";

// ... existing server code


const deepgramLive = getDeepgramLiveConnection(async (data: string) => {
 // ... existing Deepgram logic
  if (transcript) {
    console.log(`transcript received: "${transcript}"`);
    const openAIResponse = await getOpenAIChatCompletion(transcript);
    console.log(`openAIResponse: ${openAIResponse}`);
    const elevenLabsAudio = await getElevenLabsAudio(openAIResponse);
  }
});
Next, we need to send this audio to our front end over the existing socket connection. First, we need to get a reference to the existing socket connection. We can define a new variable clientSocket to store this:
// ... existing code

let clientSocket: Socket;

socketIOServer.on("connection", (socket) => {
  console.log("socket: client connected");
  clientSocket = socket;

// ... existing code
Now that we have this reference, let's use it to send data to our frontend:
// ... existing code
    const elevenLabsAudio = await getElevenLabsAudio(openAIResponse);
    if (clientSocket) {
      clientSocket.emit("audioData", elevenLabsAudio)
    }
// ... existing code
Finally, we need to play this audio in our front end. Go back to page.tsx in the frontend directory, and add the following code snippet in the existing useEffect() function:
  useEffect(() => {
      // ... existing code

      socket.on("audioData", (arrayBuffer: ArrayBuffer) => {
        const blob = new Blob([arrayBuffer], { type: "audio/mpeg" });
        const audioUrl = URL.createObjectURL(blob);

        const audioElement = new Audio(audioUrl);
        audioElement.play();
      });
    });
  }, []);

// ... existing code
This is all we need to play audio in our frontend. Re-run your app. It should speak back to you now!
Improve the UI
We're now in the home stretch. The last thing to do is to make our frontend look a bit nicer so that the user experience is more intuitive.
Let's add a state hook isRecording that tracks whether the user is speaking or the machine is speaking. We'll use this hook both to control our audio recorder and to implement our new UI components. Update your component so that it tracks this state. :
// ... existing code
const [isRecording, setIsRecording] = useState(true);

// ... existing code

      socket.on("audioData", (arrayBuffer: ArrayBuffer) => {
        setIsRecording(false);
        const blob = new Blob([arrayBuffer], { type: "audio/mpeg" });
        const audioUrl = URL.createObjectURL(blob);

        const audioElement = new Audio(audioUrl);
        audioElement.onended = () => setIsRecording(true);
        audioElement.play();
      });

// ... existing code
Add a new effect hook that updates mediaRecorder based on this state.
// ... existing code
  useEffect(() => {
    if (mediaRecorder && mediaRecorder.state !== "inactive") {
      if (isRecording) {
        mediaRecorder.resume();
      } else {
        mediaRecorder.pause();
      }
    }
  }, [isRecording, mediaRecorder]);
// ... existing code
With this change, our app will pause audio recording when system-generated audio is playing. This will improve our user experience.
Now, let's add some UI components that display the state of the app. First, add the following css to page.module.css :
@keyframes rotate {
  from {
    transform: rotate(360deg);
  }
  to {
    transform: rotate(0deg);
  }
}

@keyframes pulsate {
  0% {
    transform: scale(1);
  }
  50% {
    transform: scale(1.2);
  }
  100% {
    transform: scale(1);
  }
}

.speaker-indicator.pulsate {
  animation: pulsate 1.5s infinite ease-in-out;
}

.speaker-indicator {
  width: 75px;
  height: 75px;
  border-radius: 50%;
  display: inline-block;
  vertical-align: middle;
  margin-right: 16px;
}

.you-speaking {
  background-color: green;
}

.machine-speaking {
  background-color: blue;
}

.center-vertical {
  display: flex;
  align-items: center;
  justify-content: center;
  flex-direction: column;
  height: 100vh;
}

.title {
  text-align: center;
  font-size: 32px;
  margin-top: 80px;
  position: absolute;
  width: 100%;
}
Now update the JSX in our component to the below:
  return (
    <>
      <div className={styles.title}>VoiceGPT - your voice AI assistant</div>
      <div className={styles["center-vertical"]}>
        <div
          className={`${styles["speaker-indicator"]} ${
            styles["you-speaking"]
          } ${isRecording ? styles.pulsate : ""}`}
        ></div>
        <br />
        <div>{isRecording ? "Listening..." : "Speaking..."}</div>
        <br />
        <div
          className={`${styles["speaker-indicator"]} ${
            styles["machine-speaking"]
          } ${!isRecording ? styles.pulsate : ""}`}
        ></div>
      </div>
    </>
  );
Re-run your app. It should now look like the demo video!
Where to go from here
If you made it this far, good work! You now have the foundations to build voice-powered apps.
This is a basic app, but you can use this as a springboard to build your own ideas. If you want to continue to build on top of your existing work, here are some ideas:
Improve OpenAI prompting: You can build more specialized use cases by giving OpenAI more thorough and specific prompts. For example, tell it to be a motivational coach or a tax advisor!
Add data sources and information retrieval: Build a more useful voice assistant by giving it access to new data sources, like a database or an external API. You can use tools like Langchain Agents to accomplish this.
Improve socket lifecycle management: You may have noticed some connection issues as you were running your app locally. This is because we didn't focus on socket lifecycle management. You can add some logic to improve connections between your frontend, backend, and the APIs we consumed.
Add streaming for speech synthesis: One way to decrease latency in our app is to stream audio from ElevenLabs (using their WebSockets API) instead of waiting for the API to process our entire request.
- (Note: I couldn't figure out how to get this to work in the front end. The audio that was playing in the browser was choppy. If you figure this out, lmk)
Deploy this to the web: See what breaks when you deploy this to production.
Add this to an existing app: Give your users the ability to speak to your existing apps for convenience.